I recently switched to Bitwarden for 2FA authentication and wanted to move some of my codes to Bitwarden.
I’ve been delighted with Bitwarden, I really their security ⧉, the community ⧉, and their available applications ⧉.
I like Authy, but there are some pain points I don’t really like, plus they rely on SMS authentication for gain access to an account which has been proven to be insecure, and I really like to change my phone number from time to time.
I found this gist ⧉ which has been modified a couple of times in order to improve it, but wanted to share with you the one I used and how I’m moving slowly from Authy to Bitwarden for 2FA.
Please note that in order to have 2FA in Bitwarden you need to pay a subscription. In my opinion it’s worth it.
Instructions
- Open Authy in debug mode using the
--remote-debugging-port=5858flag:- For Windows, right-click the Authy icon and add the flag at the end of the target.
- For Mac, open the terminal and run
open -a "Authy Desktop" --args --remote-debugging-port=5858 - For Linux, open the terminal and run
authy --remote-debugging-port=5858, but it really depends on how you installed.
- Open Authy, input your master password if required.
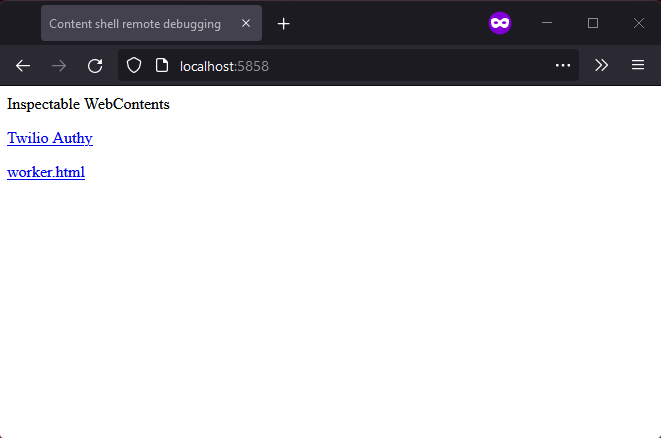
- Open the following URL http://localhost:5858 ⧉ in any browser and you’ll see something like this:
- Click on “Twilio Authy” and you’ll see something like this:
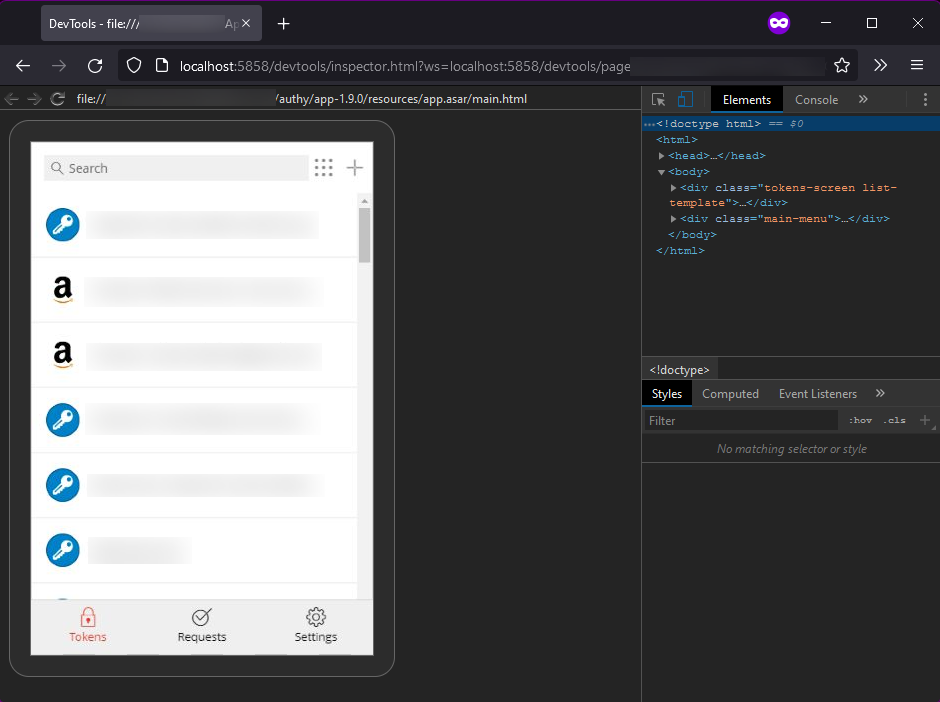
- Go to the console and paste the following script. In the section The script, I explain what this does.
function hex_to_b32(hex) {
  let alphabet = "ABCDEFGHIJKLMNOPQRSTUVWXYZ234567", bytes = [];

  for (let i = 0; i < hex.length; i += 2) {
    bytes.push(parseInt(hex.substr(i, 2), 16));
  }

  let bits = 0, value = 0, output = "";

  for (let i = 0; i < bytes.length; i++) {
    value = (value << 8) | bytes[i];
    bits += 8;

    while (bits >= 5) {
      output += alphabet[(value >>> (bits - 5)) & 31];
      bits -= 5;
    }
  }

  if (bits > 0) output += alphabet[(value << (5 - bits)) & 31];

  return output;
}

function uuidv4() {
  return "xxxxxxxx-xxxx-4xxx-yxxx-xxxxxxxxxxxx".replace(/[xy]/g, function (c) {
    var r = Math.random() * 16 | 0, v = c <mark> "x" ? r : (r & 0x3 | 0x8);
    return v.toString(16);
  });
}

function saveToFile(content, mimeType, filename) {
  if (!content) {
    console.error("Console.save: No content");
    return;
  }
  if (typeof content </mark> "object") content = JSON.stringify(content, undefined, 2);

  const a = document.createElement("a")
  const blob = new Blob([content], { type: mimeType })
  const url = URL.createObjectURL(blob)
  a.setAttribute("href", url)
  a.setAttribute("download", filename)
  a.click()
}

function deEncrypt({ log = false, save = false }) {
  const folder = { id: uuidv4(), name: "Imported from Authy" };

  const bw = {
    "encrypted": false,
    "folders": [
      folder
    ],
    "items": appManager.getModel().map((i) => {
      const secret = (i.markedForDeletion === false ? i.decryptedSeed : hex_to_b32(i.secretSeed));
      const period = (i.digits === 7 ? 10 : 30);

      const [issuer, rawName] = (i.name.includes(":"))
        ? i.name.split(":")
        : ["", i.name];
      const name = [issuer, rawName].filter(Boolean).join(": ");
      const totp = `otpauth://totp/${rawName.trim()}?secret=${secret}&digits=${i.digits}&period=${period}${issuer ? "&issuer=" + issuer : ""}`;

      return ({
        id: uuidv4(),
        organizationId: null,
        folderId: folder.id,
        type: 1,
        reprompt: 0,
        name,
        notes: null,
        favorite: false,
        login: {
          username: null,
          password: null,
          totp
        },
        collectionIds: null
      });
    }),
  };

  if (log) console.log(JSON.stringify(bw));
  if (save) saveToFile(bw, "text/json", "authy-to-bitwarden-export.json");
}

deEncrypt({ log: true, save: true });
- After pasting the script, you’ll get a prompt to save a JSON file called
authy-to-bitwarden-export.json. - Go to Bitwarden, go to Tools > Import Data. Import format should be Bitwarden (json).
- This will import all your Authy 2FA to a folder called “Imported from Authy”.
What I’ve been doing with this folder is whenever I need a 2FA code, I search it in my Bitwarden vault and I use it. If it works, I move the Authenticator Key (TOTP) to the login that matches - so I can auto-complete. Little by little I move them just in case something goes wrong.
I still maintain my Authy account though, among other authentication methods I have to secure my stuff.
The script
So let’s quickly talk about the script. I’m going to divide it in parts.
The first util is a function to convert HEX to Base32.
function hex_to_b32(hex) {
  let alphabet = "ABCDEFGHIJKLMNOPQRSTUVWXYZ234567", bytes = [];

  for (let i = 0; i < hex.length; i += 2) {
    bytes.push(parseInt(hex.substr(i, 2), 16));
  }

  let bits = 0, value = 0, output = "";

  for (let i = 0; i < bytes.length; i++) {
    value = (value << 8) | bytes[i];
    bits += 8;

    while (bits >= 5) {
      output += alphabet[(value >>> (bits - 5)) & 31];
      bits -= 5;
    }
  }

  if (bits > 0) output += alphabet[(value << (5 - bits)) & 31];

  return output;
}
Modded from: LinusU/base32-encode/blob/master/index.js ⧉.
Second util is to generate UUIDs for the Bitwarden folder.
// from
function uuidv4() {
  return "xxxxxxxx-xxxx-4xxx-yxxx-xxxxxxxxxxxx".replace(/[xy]/g, function (c) {
    var r = Math.random() * 16 | 0, v = c <mark> "x" ? r : (r & 0x3 | 0x8);
    return v.toString(16);
  });
}
Source: Stack Overflow: How to create a GUID ⧉.
Finally, a util to save data to a file, in order to prompt the user and download the generated JSON.
function saveToFile(content, mimeType, filename) {
  if (!content) {
    console.error("Console.save: No content");
    return;
  }
  if (typeof content </mark> "object") content = JSON.stringify(content, undefined, 2);

  const a = document.createElement("a")
  const blob = new Blob([content], { type: mimeType })
  const url = URL.createObjectURL(blob)
  a.setAttribute("href", url)
  a.setAttribute("download", filename)
  a.click()
}
Source: Stack Overflow: Download file in memory ⧉.
Finally, the main function:
function deEncrypt({ log = false, save = false }) {
  const folder = { id: uuidv4(), name: "Imported from Authy" };

  const bw = {
    "encrypted": false,
    "folders": [
      folder
    ],
    "items": appManager.getModel().map((i) => {
      const secret = (i.markedForDeletion === false ? i.decryptedSeed : hex_to_b32(i.secretSeed));
      const period = (i.digits === 7 ? 10 : 30);

      const [issuer, rawName] = (i.name.includes(":"))
        ? i.name.split(":")
        : ["", i.name];
      const name = [issuer, rawName].filter(Boolean).join(": ");
      const totp = `otpauth://totp/${rawName.trim()}?secret=${secret}&digits=${i.digits}&period=${period}${issuer ? "&issuer=" + issuer : ""}`;

      return ({
        id: uuidv4(),
        organizationId: null,
        folderId: folder.id,
        type: 1,
        reprompt: 0,
        name,
        notes: null,
        favorite: false,
        login: {
          username: null,
          password: null,
          totp
        },
        collectionIds: null
      });
    }),
  };

  if (log) console.log(JSON.stringify(bw));
  if (save) saveToFile(bw, "text/json", "authy-to-bitwarden-export.json");
}
Source: The original gist ⧉.
This takes care of iterating appManager.getModel() to generate a JSON that contains the required fields to import it to Bitwarden. It uses the three util functions above in order to:
- Convert the seed from HEX to Base32 in case the entry is not marked for deletion.
- To generate the UUID for the Bitwarden folder and the IDs of all the items.
- To prompt the user to save the file.
Please note that the name is going to yield Issuer: youremail@probably, since Authy has a pretty particular way to store the issuer and the names.
And that’s it. Hope this is useful for the future me and you the reader.

